Thursday, March 31, 2011

Camping Party

If you have boys, and there anything like mine, they love the outdoors!! I love the idea of a camping themed party! I actually love it so much that it's the theme for my 6 year old's birthday this April. The Blackberry Vine has such a cute camping party that I wanted to share some of the photos and ideas from the party. I love the sash/badges that the kids get for completing each activity. It's a great way to really get the kids involved and instead of prizes make a badge that fits the activity they are doing. These were actually made from a cricut but similar stickers can also be found at local craft & scrapbook stores. I am an invitation nut. I LOVE cute invitations and have said before how I think it's one thing you shouldn't over look. It's what I call "the first impression" of the party. These invitations are so clever and cute. Now, maybe not practical if you have to mail invitations. However, if you are handing them out they are a great way to get the kids excited for the upcoming party.
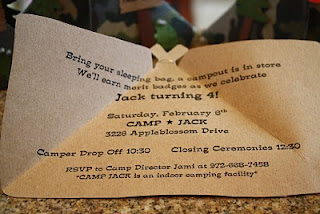
Table Scape Idea: Kids Party Venues set up this outdoor camping inspired table.


Tuesday To Do Party

Ribbon Wreath~DIY

DIY: Ribbon Wreath Materials Needed: Styrofoam wreath, any size. (I used a small wreath so it would fit on my office door) Multiple patterns of Ribbon. I used a mixture of ribbon with and without wire. However, I thought the wire ribbon worked better to shape once the wreath was completed.

Step1) Determine the length of ribbon you will need by wrapping one piece for your pattern.

Step2) Cut all your ribbon the same length. I used about 17" long pieces for my wreath.

Step3) Tie ribbon onto the wreath, double knotting, and leaving the knots on the outside of the wreath.
The ribbons will slightly overlap so that the knots are next to each other and cover the wreath.

Alternate patterns around the wreath.


Step 4) Once the wreath is completely covered, trim the ribbon so that the pieces are all about the same length.

My finished wreath hanging on my office door.
I always like to give an approx cost breakdown. I spent $ 5 on the wreath and around $10 on the ribbon. I used some tulle that I already had and had some ribbon left over.

Crepe Paper Banner- DIY

Banners, especially customized banners are such a trend right now in parties. I wanted to create something different than the printable pennant banners and something budget friendly. Step 1) Start with a round shape(the bigger the circle the bigger the flower will be). Glue crepe paper around the outside edge, scrunching accordion style to create "ruffles". Continue scrunching in a circle, spiraling until you have reached the center. Completed flower will look like this:Step 2) Once you have completed flowers, turn over and punch a hole on the left and right side. This will be to tie your ribbon through. You can also just hot glue your ribbon to the backside.
Step 3) Optional: I like to scrunch each layer of the crepe paper to give it a more "full" look.

Step 4) Depending on your theme, place in the center of each "Flower" a character, number, name, etc. I chose to only do 3 flowers because the space I had to hang this is small. If you have a larger space make enough to spell "Happy Birthday". I chose to punch out two circles with trucks and then used my cricut to cut out a large "7".
Step 5) I used a paper garland to string my "flowers" together. You can also use ribbon or left over crepe paper.

My total cost was approx $6. $3 for crepe paper, $2 for paper garland and approx $1 for paper, with plenty leftover to make at least 3 more.


Have you tried it? Send me pics! I would love to show your take on this DIY. The variations are endless!

Wednesday, March 30, 2011

Enter my Giveaway!!

I'm so excited to announce my first giveaway! I wanted to do something a little different for a giveaway so I decided to give away a super cute Party Centerpiece from the Raz collection! Retail value of approx $60. Ok, so here's the deal. Most of you know I am a newbie so I am going to give you a few ways to enter:

(29.5" )


Remember you only have to do one of the following to enter but the more you do the better chance you have to win!!


1) Become a follower or subscribe to my blog


2) Vote for Maddysons Lane on www.circleofmoms.com/top25/party-planning


(please message me or email me at chicpolevaulter@yahoo.com and let me know you voted. You can vote once a day and every vote counts as an entry!)


3)Like me on facebook Maddysons Lane


4) Share this on Twitter or become a follower


The contest will end on April 4th (this monday) at 5:00. The winner will be selected at random and I will posted on my blog. Once there is a winner I will contact you to get your shipping address. Good Luck!

Easter Treat Bags

I LOVE the DIY project but sometimes you have to break down and just buy things that you know you can make. These bag toppers I ran accross I thought were so cute!! I think these are just as cute as anything you can buy and print online. Plus they are cheaper and you don't have to print them. They are avaible at hobby lobby 20 for $2.99. Plus I bought mine when they were 40% off!


I found 3 different styles available, all have 3d features from the egg, glitter, and furry ball tail.
I plan to use mine to fill with prizes. As home room mom I always try to have atleast 3 games for my boys class parties and I try to do a prize for each game. I thought these would be perfect to hold a fe trinkets and candy.


Want to customize them? Use them for your kids treats and add a cute custom label saying who they are from. Make your own or look on etsy. For around $2.50 you can purchase a sheet of customized easter labels.

Easter Printables ~FREE!

Easter is going to be here before we know it! It's about this time that I start planning for the parties we have, the gifts for classmates and treats I'm going to make. We all know that printables are such a huge trend right now. There are some really great packages you can buy on party websites and etsy. However, so many people are putting free printables online that with a little bit of searching you can find some super cute printables for nothing more than the cost of ink. I put together some of my favorites below:


This collection is available at http://www.catchmyparty.com/ . You can use a 1 1/2-2" punch on these. Use them for your cupcake toppers or hang tags. The http://www.partyboxdesign.blogspot.com/ is just getting ready to release this free printable set. She is going to have invites, toppers, favor tags, and favor boxes all available in this fun theme!


The printables below are actual from 2 years ago but are still available at http://www.babalisme.blogspot.com/.
The rest of the images are all done by Kristen from embellish. Any of these can be downloaded from http://www.catchmyparty.com/ In each of these sets there is everything you need to print for your entire party. Water bottle labels, cupcake wrappers and toppers, banners and gift tags.

Monday, March 28, 2011

April Fools Day Idea

I was recently looking for some fun "prank" ideas to pull on my boys on April Fools Day and I ran across this idea on www.familyfun.go.com. It was really easy to put together and I think my boys will really get a kick out of it. I think sometimes we over look April Fools day, but what a great day to have some extra FUN with your kids! On April Fools' Day, trick your family with a tiny breakfast that's really a cleverly disguised dessert. Ingredients FOR THE EGGS: 3 tablespoons white chocolate chips 12 yellow M&MS FOR THE FAKIN': 1 square caramel 1 Tootsie Roll Midgee X Instructions For the eggs: Melt the white chocolate chips according to the package directions. Transfer the melted chocolate to a ziplock bag and snip off a corner. Squeeze nickel-size portions of the chocolate onto a sheet of waxed paper, then gently press a yellow M&M, letter side down, into the center of each. Let the candies cool. Makes 12 eggs. For the fakin': Remove the wrapping from a square caramel and a Tootsie Roll Midgee. Microwave the candies for 4 seconds to make them soft. Use your thumb and forefinger to slightly flatten each candy piece, then press them together. Halve the candy, then stack and press the pieces into alternating layers. Slice a 1/4-inch-wide piece from the stack. Pinch and stretch the piece lengthwise into a flat bacon strip, then cut it in half. Add ripples to each half by gently bending the edges. Makes 3 strips (6 pieces). If you try it, I would love to hear about it and see your photos!

What A Hoot Party!

What a Hoot! This is one of my favorite parties! Owls are a big trend right now in parties and this is like a cross between that and Dr Seuss. How can you not look at this and smile! Anj from Snowy Bliss mixed her super creative nature, along with a little help from etsy and this is what she created. Anj goes into great detail on her blog about how she pulled of every detail. The window below, she had printed. The bed above is a great way to take a normal table and make it over the top cute!
Invitations, to me, are the first impression of what your party is going to be. With etsy you can buy a template for some very cute invitations and have as many as you want printed from walgreens, walmart, or any other picture printing service.
Plastic plates with super cute patterns are available at just about any store you go into these days. Some of the cutest patterns and shapes I've seen can be found at Hobby Lobby, Pier 1, and Target. They range from about $2-5 each.
Now if you are crafty like Anj, you can send home each of your guests with a custom made owl of their own. If it's within budget you can purchase them on etsy. Or, look in your paper for seamstress ads. The felt is super cheap and many of the seamstresses charge by the hour (or at least in KC they do) and you could have great favors for cheaper than you think.

I hope you enjoy this as much as I do. I think I need to borrow a friends little girl just so I can have a party like this!

Saturday, March 26, 2011

Splash of Color Party

I know when we have a party coming up the biggest question is always what's the theme going to be?! I've even come up with the theme and then couldn't locate any supplies to go with the party. So, after receiving some of my Round Top Collection order, that I am planning to use on an upcoming party, I thought about showing how easy and fun it would be to do a party all about COLOR!

I Created pinwheel cupcake toppers from tulle, lollipop sticks, pinwheels and raffia ribbon. The napkin rings are available at Hobby Lobby (a 4 pack for $5). These can be a DIY project. 1) Curl grosgrain ribbon by wrapping it around a small dowel rod and then baking it in the oven for 10-20 min. 2) Cut approx 6-8 different color ribbons into 4 in strips. 3) Tie in the middle and attach to a metal napkin ring. PS...Yes, I've actually done this project! It's not just a crazy idea. Spraying the ribbon with spray starch will also help to really hold the curl! :)


I added a fun fabric flower to the center of each pinwheel just to make it stand out a little.


All the metal Party Decorations are from the Round Top Collection. I order an extra set of each to do in an upcoming give-away that I am very excited about. Look for ways to enter in two weeks!!


If you want to create your own splash of color cake check out this cake from http://www.hostessblog.com/. She gives step by step instructions on how to create your own.


I thought these Pom-Poms would add so much color and whimsy to a party. Look to my last blog on where to find step by step instructions on how to create these from nothing more than tissue paper! You can also find these available on etsy for sale.


I'm blogging from the road this week so bare with me! I'm very excited about all the upcoming projects in the next few weeks and can't wait to share them with you.